新页面
Uploading
本指南将逐步讲解如何通过 anVRChat Avatar创作者助手(VRChat inCreator 3.0
This guide provides a step-by-step walkthrough for uploading your avatar withCompanion,简称VCC)使用 Avatar 3.0,0 utilizing上传您的虚拟形象。VCC the是 VRChat Creator官方提供的强大工具,可用于获取最新版本的软件包和工具(包括 CompanionSDK (VCC), a powerful tool provided by VRChat for accessing the latest versions of packages and tools, including the SDK.)。
Terminology:术语表:
- Unity:
The game engine utilized by VRChat.VRChat使用的游戏引擎 - Unity编辑器(Unity
Editor:Editor):The program used for avatar uploads.用于上传虚拟形象的程序 Package:软件包(Package):A collection of files added to the可添加到 UnityEditor, which can include software, avatars, shaders, or other编辑器中的文件集合,可能包含软件、虚拟形象、着色器或其他 Unityassets.资源- 虚拟形象SDK(Avatar
SDK:SDK):A VRChat package encompassing everything necessary for uploading a basic avatar.VRChat提供的包含基础虚拟形象上传所需全部资源的软件包 - 基础SDK(Base
SDK:SDK):A required package for the Avatar SDK to function.虚拟形象SDK运行所需的必要软件包 VRChatVRChat创作者助手(VCC):Creator Companion:A VRChat program designed to streamline the setup of theVRChat开发的程序,用于简化 UnityEditor and Avatar SDK, potentially extending to other packages in the future.编辑器和虚拟形象SDK的配置,未来可能支持更多软件包管理
Install The Creator Companion安装创作者助手
Download the Creator Companion下载创作者助手
To install the creator companion, go to访问 https://www.vrchat.com, click ,点击Log In, log in, and go to the Downloads section,完成登录后进入下载页面
![]()
How to get to the downloads section.(图示说明:如何进入下载页面)
Then, scroll down and Click the向下滚动页面,点击 Download the Creator Companion Button.按钮
![]()
The Creator Companion download button(图示说明:创作者助手下载按钮位置)
Run the Creator Companion installer运行创作者助手安装程序
Run the file downloaded (it should be called VRChat_CreatorCompanion_Setup[numbers]运行下载的安装文件(文件名应为VRChat_CreatorCompanion_Setup[数字].exe_), select exe_),选择Install for me Only (Recommended), accept the license agreement, and select an install folder and a Start menu folder. It is fine to leave these on the defaults.,接受许可协议,选择安装目录和开始菜单文件夹(建议您保持它的默认安装路径设置)
Set up the Creator Companion配置创作者助手
Run Setup初始设置
Once the installation is complete, the Creator Companion should start. (If not, you can launch it from your start menu).安装完成后,创作者助手将自动启动(若未启动,您可从开始菜单手动启动)
On first launch, it will set everything up for you.首次启动时,创作者助手将自动完成基础配置
Once you see the Welcome screen, press “当您看见欢迎界面时,点击Show me around”.around
The creator companion will tell you where to find important tabs, like your Projects or the Settings.程序将引导您了解其重要功能区域(如项目管理、设置等)
![]()
The Creator Companion Welcome screen(图示说明:创作者助手欢迎界面)
After a few seconds, you can press 数秒后点击Continue to go to the setup.进入设置流程
![]()
The Creator Companion Introduction screen.(图示说明:创作者助手介绍界面)
If the若未检测到 Unity Editor is not found, it will say编辑器,将提示 Unity Editor Not Found, and here you can press Continue again.,此时您可再次点击继续
If you do have the若您已安装 Unity Editor installed, you can move on to .编辑器,可跳过以下安装步骤:
After pressing continue, you can press点击继续后,您可点击 Install Unity to bring you to the进入 Unity Hub Installation screen.安装界面
![]()
The(图示说明:Unity CreatorHub安装界面)
安装 Unity Hub Installation Screen
Install Unity HubHub
To install the Unity Hub, click on the您可点击 Download the Unity Hub from Unity's website link这一链接来下载 orUnity go Hub,或直接访问Here下载页面 and press the Download button.,在下载页面中点击下载按钮。
Then run the program you’ve downloaded (called下载完成后,运行下载下来的 UnityHubSetup.exe). In安装文件,在其的安装窗口中,同意许可协议,选择安装目录后点击安装。
此安装目录将用于存放不同版本的 Unity hub.编辑器,每个版本约占用 10GB 空间
This install folder will be where
创建 Unity will账户
在 Unity Editors.Hub Note窗口中点击 that this folder can take up to 10 GB per editor version (usually only 1)
Create a Unity Account
In the Unity Hub, press the Create Account button. This will bring you to the Unity Website.
On there, fill in your details, complete the CAPTCHA, check the required boxes, and click,跳转至Unity官网注册页面,在注册页面上填写注册信息,完成验证码,勾选协议后点击 create aCreate Unity ID.
Then go to your email and click the confirm link.
Now, go to your之后前往邮箱点击确认链接激活账户,并返回 Unity Hub program, and sign in with your new account.使用新账户登录
If you see the following popup, check若出现以下授权提示,勾选 Always allowapi.unity.com to在关联的应用中打开此类链接 open links of this type in the associated app and press open.后点击打开
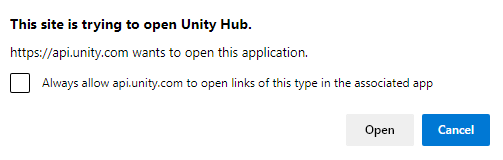
This should sign you in to Unity Hub.
![]()
The (图示说明:Unity ID Creation WebsiteID创建页面)
Enable your Personal Unity License激活个人版许可证
In the Unity Hub,Hub you will get asked to install a Unity version.
You should not do this, as VRChat will do it for you in the Creator Companion.
Check 提示安装编辑器版本时,您不必手动安装,因为创作者助手可以帮您完成这一步骤,因此请勾选Don't ask me again不再询问 and click 并点击Skip Installation跳过安装.
![]()
The Install Editor screen. We do not want to do this.(图示说明:编辑器安装界面,建议您还是不使用这个界面进行安装)
随后 Unity will then show you a popup asking you to enable your Personal License.
Click 会弹出个人版许可证激活提示,您可以点击Agree and get personal edition license同意并获取个人版许可证.
Once this is done we can return to the Creator Companion app.,完成授权后返回创作者助手
![]()
The Get Personal License screen. We do want to do this.(图示说明:个人许可证激活界面)
Install安装 UnityUnity
In the Creator Companion, click在创作者助手界面点击 I have installed the Unity Hub and click the 然后点击Install Unity [Version] button. This may take a while.按钮(安装过程可能需要较长时间)
![]()
The Install (图示说明:Unity Screen安装界面)
Create your创建 VCC Project项目
Once Unity is Installed, you will get shown a screen where you can Add or Create a project.
In this case, we want to create a new project.
Press the 安装完成后,创作者助手将进入项目创建界面,在这次的例子里,可以点击右上角的Create New Project创建新项目 button.按钮
![]()
The Add or Create Project Screen(图示说明:项目创建入口界面)
This will bring you to the Project Creation screen. In here, select Avatars, give the project a name, and select a project location.
If you have the space for it, I recommend making this a location on an SSD, preferably even an m.2 SSD, but do note that this will contain your avatar and can grow up to multiple GBs.
![]()
The Project Creation Screen
Set up your VCC Project
Launch Unity Editor
You will be brought to the Project window. In this window, you can install, update and remove packages to your liking.
An avatar project has the latest version of the Base SDK and Avatar SDK by default, so we don’t need to add anything here, and you can click Open Project.
![]()
The Project Window
Import required packages
Now that you’ve opened your project, we need to import a few UnityPackage packages.
There are three methods for importing a UnityPackage.
- Drag the UnityPackage from your Windows Explorer into the Project window at the bottom left of your screen
- Go to
Assets→Import Package→Custom Packageand select your package in the Windows Explorer window that pops up - Double click the UnityPackage file (this one only works if your Open With program is set correctly and you only have one UnityProject open)
There are a few packages which might be required for your avatar to work.
These will usually be described on the avatar’s website or purchase receipt. Some common ones are:
- Poiyomi Toon Shader: This is the most popular shader in the western market, and can be downloaded Here.
- Dynamic Bones: Older packages might use this, as it’s the predecessor to Phys Bones. You can use the VRLabs Dynamic Bones Stub, downloadable from Here (the components will not work inside the Unity Editor, but will work in game), or purchase the Dynamic Bone package Here.
- Poiyomi Pro Shader: This is a more advanced version of Poiyomi Toon, which has access to more of the features. To download it, you need to be a patron of Poiyomi, join their discord server, and download the package from there. You can become their patron Here.
- Gogo Loco: Gogo Loco is a movement system that has more features than the default VRChat movement system. It can be downloaded Here.
- VRC Fury: VRC Fury is a non-destructive avatar build system. It can be downloaded Here.
![]()
Method 2 of importing a UnityPackage.
Import the packages that are required for your avatar. Generally you can use the latest versions of these packages, except for the Poiyomi shader, use the recommended version for that.
Import your avatar
Import the UnityPackage you got for your avatar with one of the method described above
Find the scene or prefab of your Avatar
In the Project Window, there will be a Scene, a Prefab, or both for your Avatar.
If you have a Scene, double click it to open it
If you have a Prefab, click and drag it into your Hierarchy window on the top left.
![]()
An example avatar’s Assets layout. The Prefab icon might also look like your avatar in a T pose.
Upload your avatar
Open the SDK window
In the top bar, click VRChat SDK → Show Control Panel. This will open the SDK window.
If the VRChat SDK tab is missing, you are either missing some packages or have the wrong version of a package. If you go to the Console window by clicking the text at the far bottom left, the red errors can indicate which package is missing/erroring.
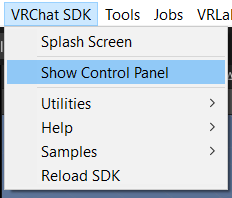
How to open the SDK window.
Log in to the SDK window
The process from here onwards assumes you are using SDK 3.3.0 or later. Older SDKs will look different and have a slightly different upload process.
Enter your VRChat Username/Email and Password in the required fields and press Sign In.
You will be asked for an authenticator code or an email code, enter this as well.
![]()
The SDK log in window.
Upload your avatar for PC
First, press the Builder button at the top of the SDK Window.
In this window:
- Select your avatar from the
Selected Avatardropdown. Make sure this is your PC version - Add a name to the
Namefield - Add a description to the
Descriptionfield - Add an image, either by:
- Selecting a thumbnail from your pc
- Or Capturing an image from the scene
- Make sure the Selected Platform is Windows
- And press the
Build & Publishbutton under theOnline Publishingtab
Once you’ve done all this, your avatar should be uploaded, congratulations.
![]()
The SDK Builder window.
(Optional) Upload for quest
This step only applies if your avatar comes with a quest version. This is not a guide on making quest versions for your avatar, just on how to upload them.
Find the Quest Prefab or Scene
Find the Quest Avatar. It should be in the same place as your PC version.
Copy the blueprint ID over to the quest prefab
Go to the Content Manager tab of the SDK. From there, you can find your uploaded pc avatar and press the Copy ID button.
Then find the Pipeline Manager object on the Quest avatar, paste the ID into the box, and press Attach (Optional).
![]()
The Pipeline Manager Component
Now, when you upload the avatar, it’ll connect to the PC version.
![]()
The Content Manager view.
Change Build Target
Select Quest in the Selected Platform dropdown in the Builder tab.
![]()
The Selected Platform dropdown.
Upload for Quest
In the Builder tab:
- Select your avatar from the
Selected Avatardropdown. Make sure this is your Quest version - Make sure the Selected Platform is Android
- And press the
Build & Publishbutton under theOnline Publishingtab